Setup Guide for Starter and Premium Accounts
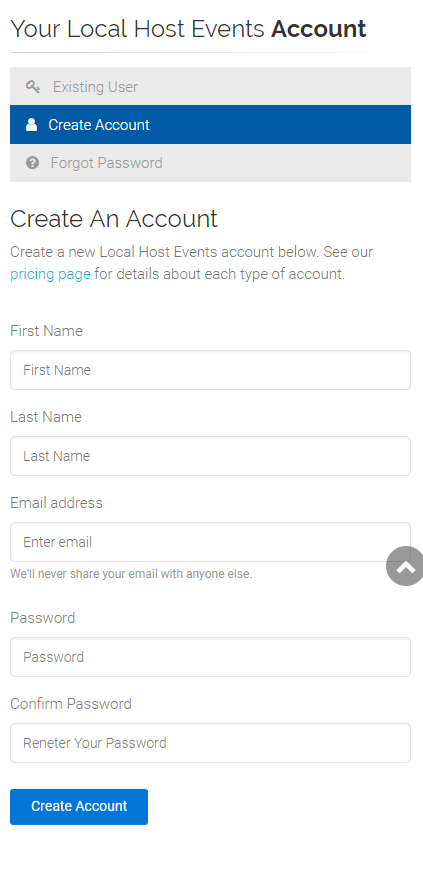
How to create an account - This will allow us to store your events so that you may edit, publish, and view reports related to your event.
- Step 1: Click on the blue ‘Login’ button at the top of the screen.

- Step 2: Select ‘Create Account’ and fill out the requested information.
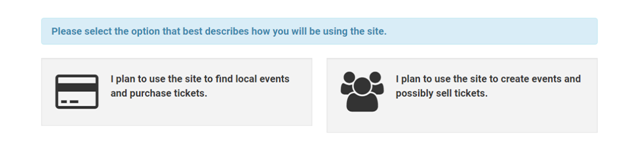
- Step 3: Click the blue ‘My Account’ button at the top of the screen.

- Step 4: Select the option for ‘I plan to use the site to create events and possibly sell tickets’.
How to create an event
- Step 1: Once you’ve logged into the site, click on ‘My Account’ at the top of the screen.
- Step 2: To add an event, click on ‘Add Event’ at the top of the screen.

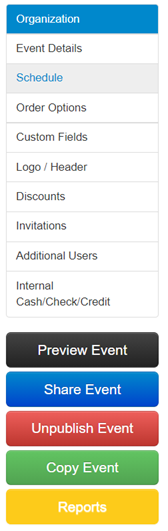
- Step 3: Organization
If you are a new organization, click ‘Add New’. Fill out all of the requested information and save. You now have an Organization to place your events under! If you are a new user with an existing Organization, click the drop down and type in the name of your organization and our system will find it for you! Select the account that your proceeds from the event should be deposited into. If there is no account associated with your organization, please contact support to get your account created (support@locallevelevents.com). If this event requires an interactive seat map then select an existing layout or create new. - Step 4: Event Details
The Event Description will appear on the main body of event page. You will want to fill out the venue name and address as this will create a Google map for you! Any contact information as well as fine print (which will appear in pink at the bottom of the event details page) can also be filled out here. If you would like to have a document (pdf) attached to your event page then upload it here. IMPORTANT: Make sure that you select who will be responsible for the fees for this event. You can have the organization or the ticket purchaser pay for either of the fees set here. - Step 5: Schedule
When will this event take place? Please refer to the instructions in blue to help you set your date! If you will be scanning tickets then set up the scanning timeframe here as well. - Step 6: Order Options
What kind of tickets or registrations will you be offering? Click on ‘Add Type’. Name your ticket/registration/item and set a price (or allow your purchasers to set their own price… ex. donations). You can also limit the number of tickets/registrations on this page as well as limiting per purchaser.
You can also turn this ticket/registration ON/OFF on specific dates/times by using our Purchase Availability at the bottom!
Once your ticket types/registrations have been entered, you will have the option to add a photo to your ticket to customize to your school or organization. Would you like notifications of sales being done or nightly/weekly sales summaries? Simply enter your email and click ‘Add’.
You have many options to get your message out to your purchaser. You can customize the text that displays on the ticket notes section, the confirmation page and in the confirmation email. Any information you would like the purchaser to agree to prior to payment can be entered in the disclaimer text box. - Step 7: Custom Fields
What information would you like to collect for this event from your ticket buyer/registrant? Select from our list of field types to customize your requested information! You are able to select from text boxes, text areas, select lists, radio buttons, checkboxes or allow the customer to upload a file. You pick which questions belong to which order options. - Step 8: Logo and Header
Add a photo to your page to personalize! You can customize even more by adding a header that will appear along the top of the main page! - Step 9: Discounts
You can set up any number of discounts on this page. Choose to set a particular amount or percentage off based on a custom code. Group discounts can also be set up with a minimum order quantity. - Step 10: Invitations
Add custom text and send an invitation to an uploadable set of customers with a link directing them back to your event page. - Step 11: Preview
Let’s check it out now and make sure everything looks good and it flows. Click on ‘Preview Event’. This will give you a view of what the purchaser will see upon going to your page! We make it easy to walk through the steps to ensure that the process makes sense to you as well as the consumer. - Step 12: Publish
Think it looks good? Great, then we’re ready to Publish! Publishing will take your link live and available for sales! Simply click on ‘Publish Event’. Once published, you will be provided with a link to share onto social media, or any other platform of your choosing!
Follow the navigation links on the left hand side of the page to set up each portion of your event.